Skip to main content
Opens in new window
NHS Wales
NHS 111 Wales
Complaints
Contact Us
Cymraeg
Cymraeg
All...
Search
Public Health Wales
Search
Cymraeg
Cymraeg
Menu
Home
About Us
Show Submenu For About Us
Header Test
Duty of Quality
Working Together for a Healthier Wales
The Duty of Candour
Annual Report
Board and Executive Team
Working with our Partners
Publication Scheme
Policies and Procedures
Topics
Show Submenu For Topics
Active School Travel
Communicable Disease Outbreak Control Plan (CDOP) Familiarisation Training
Immunisation and Vaccines
Coronavirus (COVID-19)
Bump Baby and Beyond
Beat Winter Viruses
Information and Guidance on Vaping for Secondary-aged learners in Wales
What works well for you and your mental wellbeing?
Time to Talk Public Health Panel
Enjoy Summer Safely
Streptococcus A (strep A), Scarlet Fever and iGAS
Careers
Show Submenu For Careers
Current Job Vacancies
Our Values
Our Benefits
Living and working in Wales
Applicant Information and Guidance
Making Successful Applications
Healthy travel
Public Health Specialty Training in Wales
The Public Health Practitioner Registration Scheme for Wales
Armed Forces Covenant
Microbiology
Services and Teams
Show Submenu For Services and Teams
AWARe/ Health Protection Team
Welsh Cancer Intelligence and Surveillance Unit (WCISU)
Dental Public Health
Improvement Cymru
Cervical Screening Wales
HARP
Designed to Smile
Data
News
Show Submenu For News
Public Health Wales investigates ways to reduce Carbon Emissions from Microbiology Labs
Tackle dependency, visibility, and availability to address rapid rise in youth vaping, say public health experts
Survey shows strong support for schools' role in children and young people's health and wellbeing
Latest data on substance misuse in Wales published
Measles outbreak declared in Gwent as two new cases confirmed
Two measles cases confirmed in Gwent
Health experts welcome downward trend in childhood dental extractions under general anaesthetic
Interventions to address digital exclusion improves engagement, skills, and confidence, says new report
Long-term thinking resource helps organisations protect the health of future generations
Increase in TB cases in Wales, but longer-term trend is decreasing – new report
Public Health Outcomes Framework reporting tool updated with latest data
Case studies released to demonstrate how organisations can unite to respond to cost of living
Hepatitis C eliminated in UK's biggest prison
British Science Week - Amy's Story
British Science Week - Kelly's story
British Science Week - Lee's Story
British Science Week - Dr Caoimhe McKerr's story
"Shaping Places for Well-being in Wales" Programme Aims to Tackle Health Inequalities
Novel insights show the potential of data across health and care systems to inform support for unpaid carers in Wales
Official statistics show long term decrease in age-adjusted rate of cancer deaths but increased deprivation gap
Publications
More
×
NHS Wales
NHS 111 Wales
Complaints
Contact Us
All...
Search
Listen
Home
›
Services and Teams
›
Screening
›
Antenatal Screening Wales
›
Information Resources
›
Leaflets
›
Ultrasound
›
Ultrasound documents
›
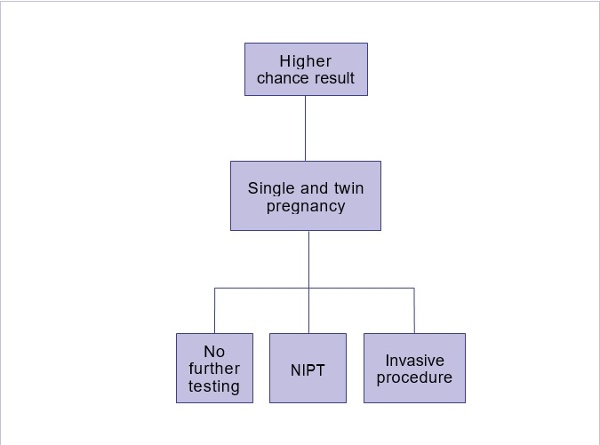
Section 6 chart 2.jpg
Section 6 chart 2.jpg